In this tutorial we are
going to look at Loan Templates. We use Loan Templates of
course to facilitate the Setting Up of New Loans. When we have Loan
templates, they populate and default most of the fields necessary to set up a
New Loan and this makes it much easier to Set Up a New Loan. |
|

|

|

We can call our Loan
Templates by any name of course, but it is quite useful to use the
differentiation as the Interest Linking because these represent at least 4
different Indicators that have to be specified on the Template or on the New
Loan. When we have a Template
for each Interest Type that we do, then any of the other fields that may
possibly be different, can be changed when we set up the New Loan. |
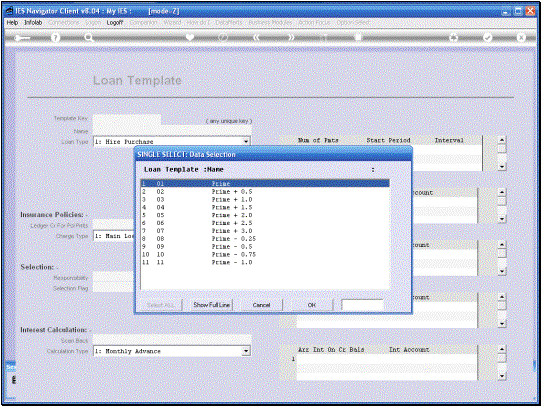
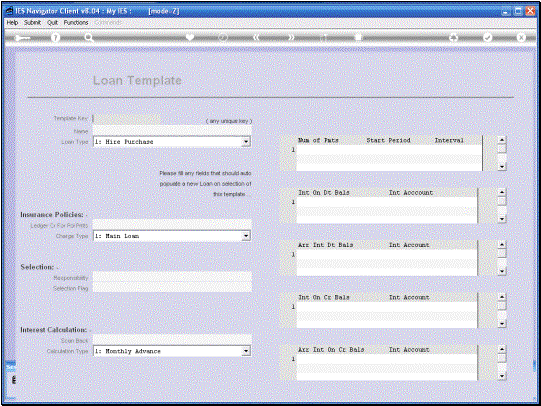
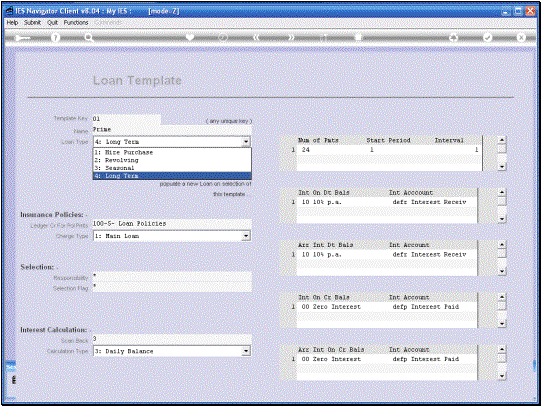
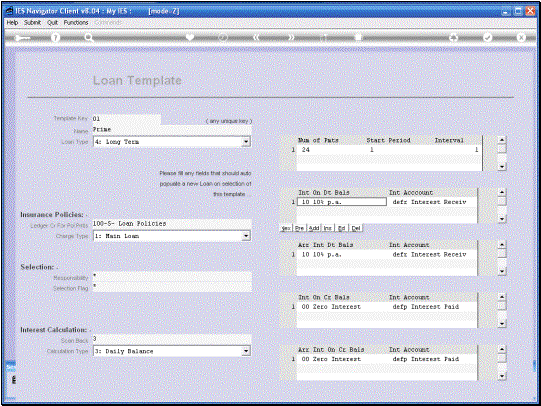
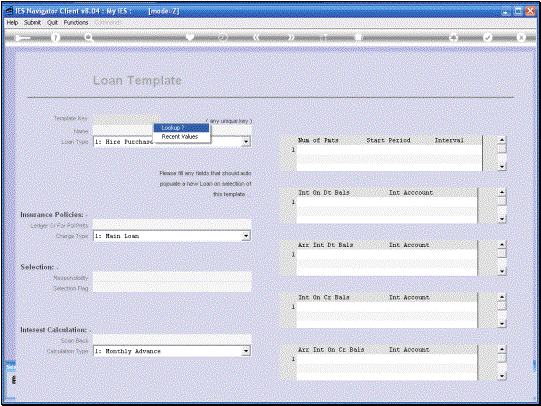
In this example we are
going to look at Template 01. A Template has a unique
Key but we can use any Key of our own design. In this case we are simply
using 2 digits to identify the Key for the Template. Then of course the
template always has a name that we can distinguish on the Lookup. |
|

On the Template we will
always choose a Loan Type, but it is worth remembering that when we select a
Template, when Setting Up a New Loan, we can change any of the fields that
are populated by the Template. So if we choose the most
common one here, then we can always, when we Set Up a New Loan, and it is a
different Type, just Re-Select the Type. At the same time it is
useful to have all these defaults already in place. |
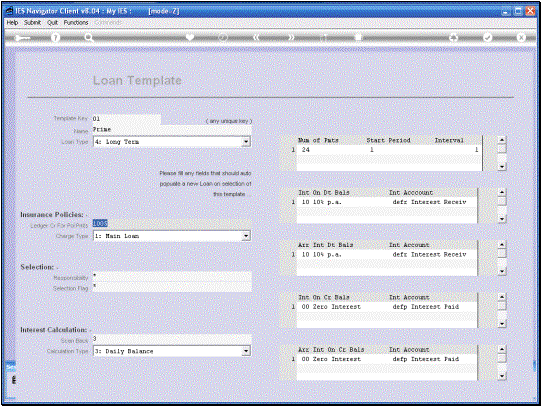
It is necessary to
specify a Ledger Credit Account for Policy Payments even if we do not have
Policies in the Loans. We do have to specify this. So then we can just use a
designated Account. If we do have Policy
deductions on the Loans for the Insurance Policies, then this is the Income
Account that will be Credited whenever we deduct a Loan Premium from the
Loan. |
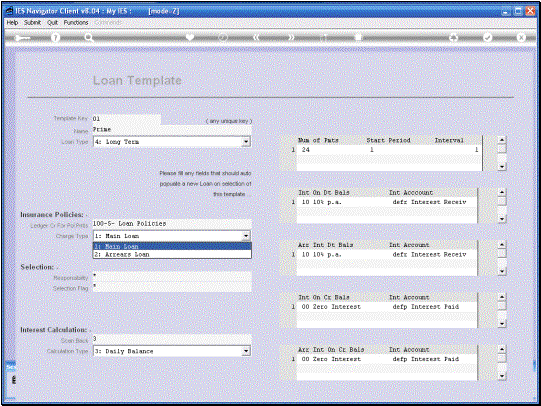
The charge Type for
Charges, including Policy Premiums, will usually be to the Main Loan. In other words, the
Capital Portion of the Loan. |
|
|
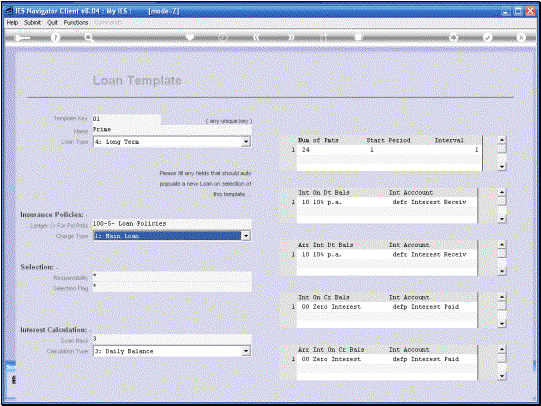
“Responsibility” is a
field that we use to indicate who is responsible for Administering this Loan
and this becomes applicable when we have multiple people who work with
different sections of the Loans Portfolio. If we do not
particularly need to differentiate “Responsibility” we can simply use an
asterisk. |
The “Selection Flag” is
used to select Loans. So once again if we want
to divide our Loans Portfolio into different groups of Loans, where we do the
Installments or the Interest, or various other actions on the Loans, at
different times, then the Selection Flag becomes rather important so that we
can select all Loans with a Flag, 01, 02, 03 or any other method that we want
to use for designating the Selection Flag. If we work with our
Loans together as a Group, in most cases, then we can simply state the
Selection Flag as an asterisk. |

The “Scan Back”
indicator is usually indicated as 3. This means that the
system will scan back for 3 Months or Financial Periods whenever it
calculates Interest. In other words if the
System is busy calculating Interest for Dec 2007 and this indicator is 3,
then it means the System will also look at November, and October, and
September, i.e. 3 months prior to the month being calculated, to see if in
this Open Period System, other Journals were posted, perhaps after the
Interest were last calculated for those months. If so, it will
re-appraise those Balances and the Daily Balances for those Periods, and if
necessary, generate New (supplementary) Interest Transactions. So in other words this
is an Automatic Adjustment Capability the System has if we post Journals on
the Loan in Prior Periods, after we have already calculated the Interest on
those Loans, for those Periods. |

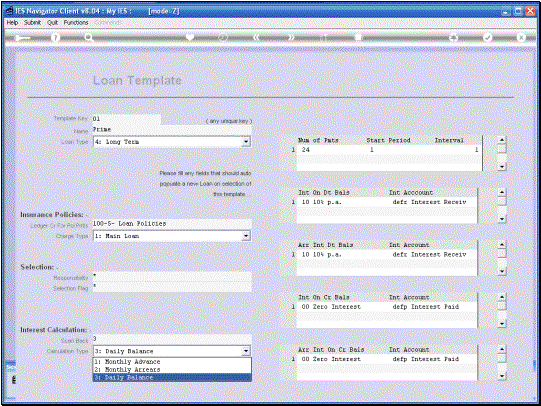
The “Calculation”
options for “Interest” include Monthly arrears and Daily Balance. The most commonly used
would be Daily Balance. |
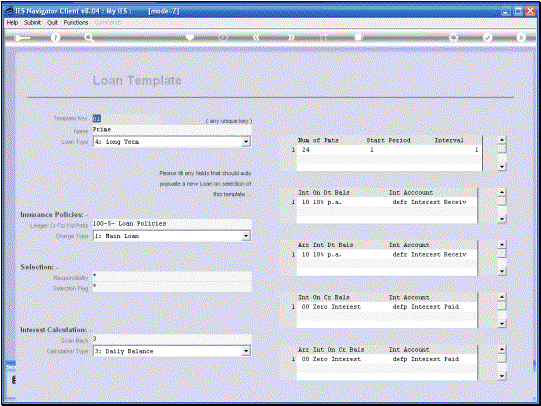
Here we specify the Loan
Term in other words 24 Payments as in this example, would actually be a Loan
Term of 2 Years. The Start Period is interesting because when we Set Up a
Loan, we may say that the 1st Installment will be in Dec or Jan or
whichever month. On the template we would
say Zero for the Current Period. So if we Open the Loan in Dec, because that
is the Current Period and if we have a Zero here, then the Loan will be
automatically set up for the 1st Installment to be in December
because that is the Current Period. If we have a “1” as in
this case, then of course that would be the next Period or the 1st
Period immediately after the current Period. So when we Set Up the Loan or
Open the Loan in December, then this indicator is 1 and the 1st
Installment is going to be due in January. Then the interval
determines how often Installments are due. Once again the most common
indicator would be 1 for Payment every Month. |
Now we get to the
Interest Indicators and these are important. On Smart Loans we expand
on the understanding as to how Smart Loans extend the functionality of
Conventional Loans. For a Conventional Loan there would only be one Interest
Indicator, but for the Smart Loan (these are all Smart Loans) there are 4
Interest Indicators because the Loan is also seen as the Capital portion of
the Loan and Current/Arrears portion of the Loan. So the 1st
one that we look at here is Interest on Debit Balances. This one is for the
Capital Portion of the Loan and usually has a Debit Balance, i.e. the Capital
amount owing. So this is the Interest Indicator for a Debit Balance on the
Capital portion. The next one will be a
Debit Balance on Current or Arrears.
Arrears Interest. Debit
Balances. After that we have the
Indicator for Credit Balances. First on Capital and then on Current/Arrears. |

In each case we also
have, not only an Interest Rate Indicator, but also an Interest Account
Indicator. We can learn more about these in the Tutorials on the Interest
Rate Groups and also the Interest Account Groups. We have these Indicators
on the Templates and it goes onto the Loans and then when we adjust the
Rates, then the Loans will automatically pick up the new or latest Interest
Rates according to these parameters. So this is just a link
to an Interest Group where an Interest Rate is specified and can be changed
and likewise with the Account. So the Account Link here
would indicate to the System, which Ledger Account will be Processed when we
do Interest Received, and likewise with Interest Paid. |
|
Note on this example
that for this template we specify for Credit Balances on Capital OR on
Current, we specify Zero Interest. We can of course give
Interest, Pay Interest on Credit Balances, but we do not have to. Let us glance back
quickly to the Debit Balances for Capital and for Current/Arrears. If we want the Loan to
function exactly like a conventional Loan, in terms of Interest, then those
two Interest Rates will be the same, as indeed they are, in this case. However if we want to
have a Penalty Interest for Installments that are late, i.e. overdue
Current/Arrears Balance, then that Interest Rate may be marginally higher
than the one specified for the Capital, which in fact is the ruling Rate for
the Loan. |

|
|
|

|

|
So as we look at the
list of Templates defined here, in this particular example, we can see that
here we have used names that differentiate the different Templates by the
Interest Rate Link that will be connected to the Template, and that will be
used for the Loan when it is selected. So if we do a New Loan
for Prime plus 2, then we simply select Template 05. If it is Prime linked,
then it is Template 01. Any of the Fields
populated by the Template automatically, on the New Loan, can still be
changed. The purpose of the
Template is to make the work less, for setting up a New Loan. |

|

|