|
IES
Appointments: Making Appointments
Purpose
The purpose of this Document
is to explain how to make appointments.
How
to make an Appointment
To
make an appointment is a simple matter. Just open the Appointment Book
by using the ‘show’ option, and choose the Date.


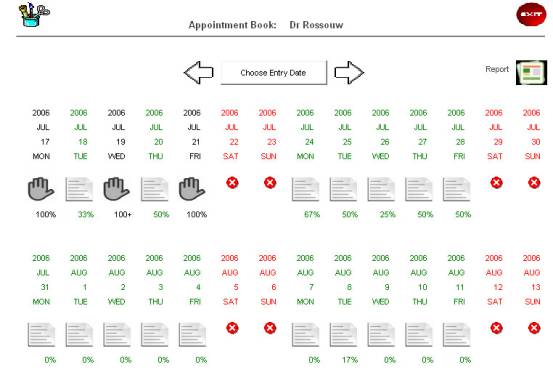
When looking at the
Appointment Book, we can click on ‘Choose Entry Date’ to move the
page to a different date, or we can use the arrows on either side of
that function to page back and forth 2 weeks at a time, respectively.
Blocked Out Dates are shown
in red, and signals that no appointments should be taken for these
dates. Where a ‘blocking hand’ is shown, the day is already fully
booked, and the ‘100%’ means fully booked, while ‘100+’ means
fully booked plus Standby appointments in addition. The remaining
dates, with the ‘page’ image indicates the current booking level.
To enter any Date currently
shown (even if blocked out!) you just click the image below the date.
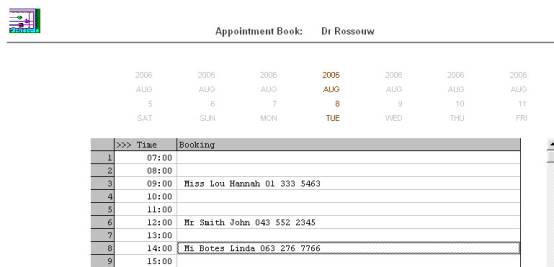
In this case we enter the date of 8 Aug 2006 in Dr Rossouw’s
Appointment Book, by clicking on the ‘open page’ image.

We notice that there are
currently 3 bookings on this date, and we can dbl-click on any empty
time slot to make an appointment for that time, or we can click below
the time slots on an empty line to make a Standby booking. In this
case, we choose the 15:00 time slot.

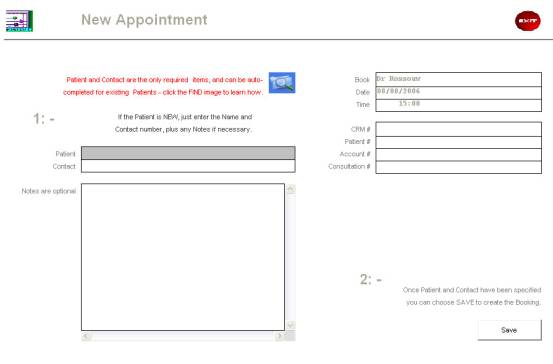
A Medical appointment
requires only 2 pieces of information, i.e. Patient Name and Contact
Number. There is also a Notes field which is optional, and which can
be used to indicate any further information that is either useful or
required for our operation.
For a NEW Patient, i.e.
someone who has never been here before and for whom we have no Patient
record, we simply note the Name and Contact Number, and any other
information we wish to have (in the Notes field), and then choose SAVE
to create the Appointment. When the Consultation record is opened
(later, probably on the day of the appointment), then the Patient
record will be created.
For an existing or former
Patient that we already have details on file, we do NOT type the name.
Instead, we use the lookup retrieval options to locate the Patient
record, and then the system will automatically establish the necessary
links to the Patient, CRM and Account records.

The lookup image can be
clicked for a reminder on how to use the lookup functions, and will
display the following information: -
Patient retrieval
may be done by means of the standard lookup or direct-type
searching on
multiple criteria: -
01) To use the
standard lookup, press F2 or click the Lookup (dbl-click and
choose Lookup).
02) To use an
implicit multi-rule lookup, use a dot (.) and use any of the
following: -
part_name.part_tel_no.part_address
OR
part_name..part_address
OR
part_name.part_tel_no
OR
..part_address
OR
.part_tel_no.part_address
OR
.part_tel_no
or
part_name.
in other words,
use any 1, 2 or 3 parts to search on, separated by dot(.)
and where part of
the family name, if specified, is always BEFORE the 1st dot, and the
tel no always after the 1st dot but before the 2nd dot, and the address
pattern, if present, is always after the 2nd dot.
Examples: -
a) finding by part name -
souw.
which would find something like
'Rossouw'
b) finding by name and address -
rossouw..sunset boul
which would find 'rossouw' living on 'sunset boulevard'
c) finding by name, tel no and address -
osso.5553.sunset
which would find the same patient where the tel no includes
'5553'
d) finding by address only -
..sunset
which would find patients living on 'sunset boulevard', 'sunset
rd', etc.
IF NO DOT (.) IS
USED, THEN THE INPUT DATA IS CONSIDERED TO BE THE TYPING OF THE
PATIENT NAME, I.E. NO LOOKUP IS ENTERED.
In other words,
if we are looking for a Patient whose surname is ‘Bouwer’, we
could type something like “bo.”, and in this case the system
yields the following:

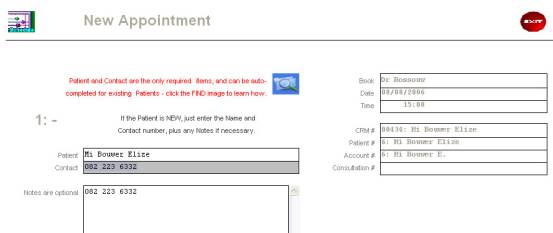
The lookup list
shows Name, Id no, and some address details, so it is quite easy to
select the correct patient, and once selected, the system
auto-completes the appointment, as well as establishing links to CRM,
Patient and Account.

After this, we
can just choose SAVE to create the appointment.
©
Infolab, 2006
|